
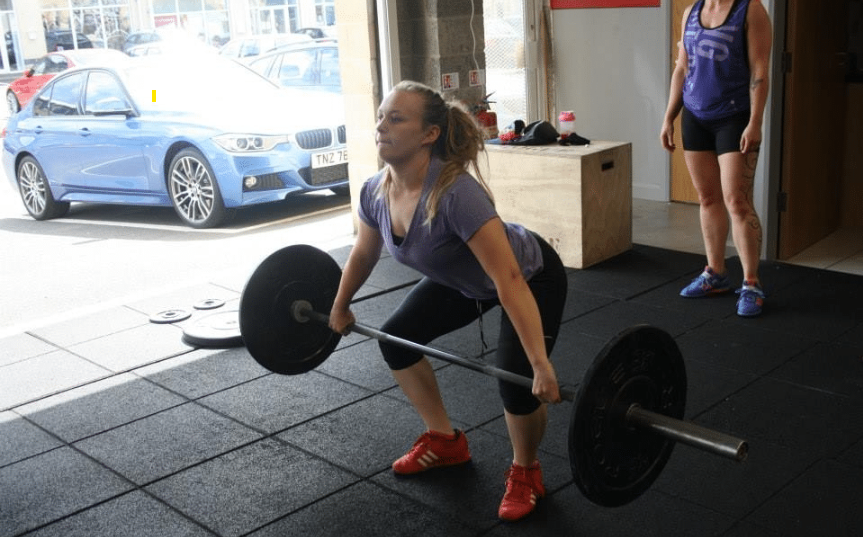
Section 4: Movement analysis, teaching/learning methods and addressing faults:
So now that you have the basics of the lifts, there’s a few ways of evaluating them.
Principles:
S-Curve:
 The S-Curve shows the direction in which the barbell should move during both the snatch and the clean.
It’s a dynamic map, same as your GPS watch draws as you run, and looking at the shape of the curve can give you insight into what’s going right (or wrong) with your lifts.
Lets have a look at the S-Curve in action:
 During the set up, we can see the shoulder position, the flat back, and the initial marker for the hip and shoulder.
 The S-curve adds to what we learned previously about the hip and shoulder rising at the same rate. Here we can clearly see from the blue line, that as a result, the bar has moved upwards, and slightly towards the lifter. The black lines indicating the position of the hip and shoulder at the start, and finish of the first pull, and the blue line showing the pathway the bar has followed during this phase of the lift.
 Our third image shows you the combined centre of gravity of the lifter and bar
Using this, we can see how the balance is affected by the position of the body in relation to the barbell, and feet (base)
It also makes reference to the leading with the chest to ensure the barbell moves, rather than lifting the bum, or concentrating on the movement of the knees during the first pull.
 As the lifter nears triple extension, the system of bar and lifter remains in extremely close proximity/contact. The chest in this image is a little too far behind the bar, and should still be ever so slightly in front, but it is important to note that during Vmax, the chest and shoulders will be behind the barbell to ensure it is not pushed or swung forward.
The feet are still planted flat (a common fault is pushing through the balls of the feet at this point.)
 The S-Curve has allowed us to look at the pathway the bar has taken during the pull, the two vertical bars are the maximal anterior and posterior horizontal displacement seen throughout the lifts.
Using these vertical markers, we can evaluate how effective and efficient the pull is. The bars will never be together, but a minimal amount of horizontal displacement is desired.
A large gap, and we look at the s-curve
- A big loop at the bottom, or bar moving in a E rather than S, and the bar is too close to the shin and moving away as it separates from the floor
- A big fat S, rather than an elongated one, and the bum has shot up as the bar left the floor, resulting in too large a posterior travel during 1st pull, straight legs during second, and a big swing as a result.
There’s a lot of information that can be gathered from the S-curve, the key is solving the problem.
As a coach, it is important to try and find the best method for teaching your athletes, so i’ve included the ways some of the exercises are structured on your programs to get an understanding of how this is used in training to improve your lifts. There’s a few methods, each of which have pro’s and cons, but having the best tools at your disposal will give you the edge, and you learn the most efficient and effective way of performing all of the exercises, more than just the weightlifting movements.
Method 1 – Top down:
The top down method is exactly as the name implies, you start at the top, and work your way down. This means starting at the recovery stage of each lift and working backwards through each phase progressively from the finish point.
While this may sound counter intuitive, there are some genuine benefits from this approach which we’ll summarise at the end.
Step 1: The overhead squat and front squats
The final part of any lift is the recovery, when we replicate these specific parts of the lift as separate exercises; for the snatch, this is an overhead squat, and for the clean, this is a front squat.
These are also two useful ways of screening athletes for movement skills proactively as part of training.
For instance, if there is a structural fault (limitations of flexibility or stability), the athlete will not be able to achieve full depth, and without first assessing this via a functional screen, we’d be unaware as to the limitations of depth and position the athlete may face.
By teaching from the top down, and incorporating the squatting movements with a barbell or lighter object, such as technique bar or brush handle, we can incorporate a functional screen into our training.
When an athlete performs the lift, we’ll see how deep it is possible to catch the barbell, and thus if we will have to use a power variant of the lifts as a result, which will be extremely relevant from step 3 onward.
Step 2: Balances (snatch) and Scarecrows (clean)
Once we’ve tested via the squat, we can move on to the next exercises:
In the snatch, this would be snatch balance, it is performed with the bar starting on the back of the shoulders, holding the bar in a snatch grip. The lifter takes a deep breath, pushes the weight to the outside of the feet, then drops quickly into a full squat, beating the bar to the floor. These are also sometimes referred to as drop snatches, with snatch balance used to describe the same exercise with a slight drive of the barbell before catching it, in much the same way as you would in a jerk.
It’s at this point you’re probably starting to realise that exercises are like cocktails, everyone has a slightly different flavour or way it’s put together, and some names overlap, even though they aren’t necessarily the same thing. That’s why it’s so important to be clear with our terminology. Much like protocol in testing, spell out exactly why and how you want exercises performed, especially when there’s room for misinterpretation. For your programs, drop snatches and snatch balance are the same, these work speed under the bar and consistency of position. If we want stability and strength, i’ll mark it with (H) which means with a heave, or jerking movement.
The benefit of the snatch balance with no drive (drop snatch), is that it teaches speed under the bar, and consistency in the bottom position. The benefit of the snatch balance with drive, is that it can be performed with a heavier weight, thus increasing the stimulus for stability, and muscular activation, especially if used a part of a warm up.
Within the clean, the exercise that is sometimes done next is scarecrows; these, much like real scarecrows, are horrible looking abominations that don’t really serve much purpose in the long run. It’s basically an upright row with a barbell, and teaches athletes to pull with their arms rather than with their legs. It’s a stupid exercise, so we’ll move on and, much like social media’s insistence of reminding us what we did 8 years ago, let’s just put it behind us and pretend it never happened. If you get high pull in your program, it’s for shoulder strength, not for your technique
Step 3 Dead Hangs:
Next on our list are dead hangs, these are either hang clean’s or hang snatches, but the bar starts very high up the thigh, almost at the top. This is a way of replicating the Triple Extension/Vmax portion of the lift from your posters. This is a good way of replacing the scarecrow, and focusing on powerful leg drive and extension of the lifts.
The high position means the bar will be relatively light, as it should always be when practicing technical movements (<70% ideally), but can be developed to surprisingly close to 1RM when trained.
The dead hang limits the pull to a few centimetres of leg extension, plantar flexion and shrug, all to get maximum height and power into the bar. The less pull and travel you have, the more the focus is on maximum power and quick pull under to make the lift succesfully.
Although starting from maximal extension is an option, it would be reserved very light weights to help pull quicker under the barbell, and would be less useful in the early stages, allowing a small amount of pull will help engage in skill based learning and develop the motor patterns and control to perform the exercise.
Step 4 Hangs:
Much like the dead hangs, but now the lift can start lower down the thigh anywhere from above the knee to about mid thigh, lifters will find different positions more comfortable than others based on limb length and biomechanical factors linked to their specific anthropometrics.
The hang allows the athlete to focus on keeping the bar close, and still perform much of the accelerated movement and gain skill as well as overload stimulus as their ability in these positions develop.
Much like the hang is another programmed lift – a “reactive” clean or snatch. This is like the hang but incorporates the SSC (stretch shorteining cycle). Like replicating a jump, you start with the bar at the hip, sliding it down into a hang and snatching or cleaning it without stopping. It should be a fluid movement, just like a vertical jump, but with a barbell.
Step 5 The full lift:
Now that the rest of the lift has been practised, it’s time to put it all together and take it from the ground.
Notice the top down isn’t “teaching the lift backwards” it’s taking phases of the lift, developing them separately, for a purpose, and building this into the full lift over time. This has the advantage of breaking the lift into bite size chunks, and enforcing effective and progressive skill development if used correctly.
Summary: exercises and uses:
Snatch: Overhead Squat ->Snatch Balance->Dead Hang Snatch->Hang Snatch->Snatch
Clean: Front Squat ->*Scarecrows->Dead Hang Clean->Hang Clean->Clean
Method 2 – Bottom Up:
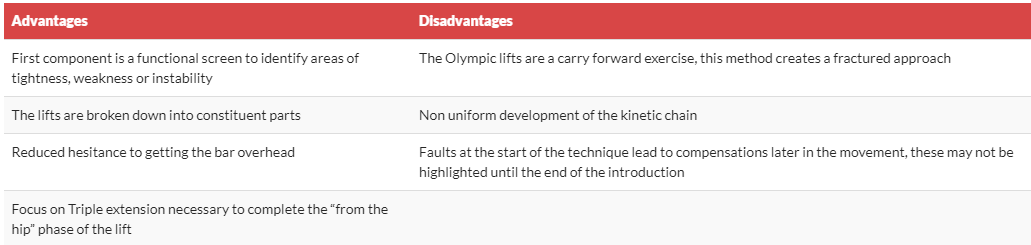
The bottom up method is, as the name implies, you start at the bottom, and work your way up.
This means teaching the:
start position first -> then first pull -> second pull -> catch -> recovery
This applies to all lifts, and, like the top down method, involves breaking each section into manageable chunks, and teaching them in smaller segments to focus on developing the skill based component of each.
As this was the order in which the sections were broken down earlier, i’ll not repeat them all here.
One point to note, a “carry forward” exercise, is one wherein the movements build and the effects of previous changes affect later movements. For instance, if the bar moves away from the thigh as it passes the knee, this will adversely affect the Vmax portion of the lift.
Similarly, if as the bar breaks from the floor, it moves forward, this will adversely affect the weight distribution on the feet, resulting in greater horizontal displacement of the barbell, and a reduced capacity for maximal extension and loading.
Carry forward is usually a term reserved for compound and closed chain exercises, where alterations or unwanted movement early on in the execution of the skill, will affect the ability of the athlete to effectively perform the skill, by making later movements more difficult or impossible to perform without error.
Advantages and Disadvantages:
Method 3 – Compartmentalisation, also known as whole-part-whole
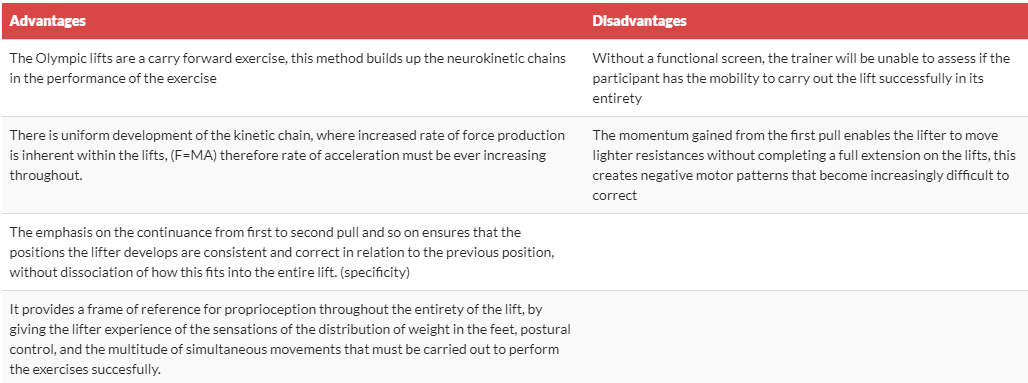
The whole-part-whole method is, a hybrid of both previous methods, it doesn’t stick to moving from one end to the other, but rather starts at any phase of the lift, and works outwards, both up and down from there.
While this could mean moving randomly from extremes of phases, it is best served when the starting point is developed upon in both directions.
For example:
Vmax -> second pull -> first pull through to Vmax -> second pull to catch -> full lift (first pull to catch)
This also applies to all lifts, and, like the previous methods, involves breaking each section into manageable chunks, and teaching them in smaller segments to focus on developing the skill based component of each, but also then developing them into a part either before or after the one just practised.
Carry forward is usually a term reserved for compound and closed chain exercises, where alterations or unwanted movement early on in the execution of the skill, will affect the ability of the athlete to effectively perform the skill, by making later movements more difficult or impossible to perform without error.
Advantages and Disadvantages:
 Drills and Skills
Drills and Skills for correcting common faults.
- “The photo opportunity”
- In the clean, a common fault is to try and curl or row the bar, losing contact with the body. The bar is rotating around the athlete, rather than the athlete rotating around the bar.
To solve this, we can use a basic drill to feel the movement and positions and encourage proprioceptive skill acquisition.
Get all athletes in the group to stand somewhere they can see you, then stand upright with arms out in front and thumbs up (the photo op).
They then place the thumbs on the thighs, which the coach indicates is now an “invisible bar”
The athletes then complete the movement of the clean but are only allowed to touch “shirt or skin” as the “bar” moves on to the shoulders. This means, that the athletes will then have to keep thumbs in contact with the body, learning how to move their shoulders, then elbows to correctly execute the “catch” position without the hands ever moving away from the body (the curl effect).
After a few successive successful attempts, the athletes then try to replicate the movement holding on to an actual barbell.
- In the clean, a common fault is to try and curl or row the bar, losing contact with the body. The bar is rotating around the athlete, rather than the athlete rotating around the bar.
- Above the knee, below the knee
- This drill is performed with a brush handle or empty barbell.
Athletes take their grip, and then are directed into the various positions (fist pull, second pull, catch, recovery) using simple and effective coaching cues if you’re working as a group, or just in your own practice if working on your technique. Don’t worry about the names of the phases, Simple terms or reference points like “above the knee”,”below the knee”, “shrug” etc. to clearly and accurately move into the desired position.
The speed of this drill can be taken slowly at first, and progressed, getting the athletes to move into the various positions, rather than consciously thinking about them. The increasing speed and or movement, makes this a good warm up drill due to the potentiation effects.
The main benefit is that this helps move from the conscious phase to the autonomous phase, and focus on the the positions, and move in to the positions without overthinking.
- This drill is performed with a brush handle or empty barbell.
- String Theory
- String theory, unlike the quantum gravity name sake, is actually relatively simple.
Get the athlete to imagine a piece of string, attached to their clothing at the point where the ribs meet, at the base of their sternum.
If the string is tied to the bar at the other end, then as the chest moves up, the bar will too.
It is a useful imagery tool for athletes to maintain a chest position above the bar, they don’t want to be too far forward or back, but to always be striving to elevate the bar upwards, pulling with their end of the string on the bar.
This is especially useful when hips lift during 1st pull, as it takes the focus away from the legs, and into moving another part of the body that is affected by the movement.
- String theory, unlike the quantum gravity name sake, is actually relatively simple.
- Reactive Pulls
- These are almost identical to lifts taken from the hang position, but instead of stopping and setting the position above the knee before lifting, the athlete is told to imagine the lift starting during the (eccentric phase) slide down to the position. They aren’t allowed to stop, but have to slide in and drive up to extension and catch in one continuous movement.
While it’s actually impossible not to stop during this 180 degree change of direction, the focus is on minimising the stop time, incresing the SSM reflex action, and creating more upward drive.
This is good for sluggish second pulls and a lack of full extension at Vmax.
- These are almost identical to lifts taken from the hang position, but instead of stopping and setting the position above the knee before lifting, the athlete is told to imagine the lift starting during the (eccentric phase) slide down to the position. They aren’t allowed to stop, but have to slide in and drive up to extension and catch in one continuous movement.
- Slow to fast
- practice slow to move fast, it’s a useful bit of knowledge, greater proprioceptive feedback and fine tuning can be achieved when moving through positions deliberately and allowing time for correction at each stage. The other way of integrating this is by deliberately slowing down the athlete’s first pull, to focus on the second pull. By slowing down the movement, they’re focusing more on the acceleration of the second pull, and maximising explosive power generation (a key use of the exercises).
This is useful where faults occur as a result of a poor transition phase (bar getting away from the thighs, weight distribution too far forward on the balls of the feet etc.)
- practice slow to move fast, it’s a useful bit of knowledge, greater proprioceptive feedback and fine tuning can be achieved when moving through positions deliberately and allowing time for correction at each stage. The other way of integrating this is by deliberately slowing down the athlete’s first pull, to focus on the second pull. By slowing down the movement, they’re focusing more on the acceleration of the second pull, and maximising explosive power generation (a key use of the exercises).
- Pause and pull
- A variation of the slow to fast from the floor, is to pause or make deliberate contact at certain points during the lift.
Eg: getting an athlete to pause above the knee, almost reinforcing “yep i’ve done this” before executing the rest of the lift.
The pause and pull helps break down parts of the lifts and make conscious effort to correct at the point where technique is breaking down.
The pause can then be minimised, and the fluid and dynamic movements of the lifts gradually reintroduced and practised.
- A variation of the slow to fast from the floor, is to pause or make deliberate contact at certain points during the lift.
- It’s not that complex
- By sequencing various parts of the lifts together as repetitions, we make what is known as a complex.
This is an extension of the 3 introductory teaching methods, for instance, we could ask an athlete to perform:
2 shrugs, 2 pull, 1 hang snatch and 1 power snatch in each set.
Any combination of multiple exercises or movements combined within a set, with no break, is known as a complex, and the variations are only limited by your imagination.
- By sequencing various parts of the lifts together as repetitions, we make what is known as a complex.
- Put it down as you picked it up
- More of a good habit forming aspect to complicated lifts, is to tell athlete’s to put the bar down, the same way they picked it up. Replicating the movements and positions as the bar is set back down. This prevents absent minded RDL’s creeping into setting down cleans etc.
While heavier lifts will require the bar to be dropped, especially on warm up movements and drills, we can encourage use of the correct positions on the way up and the way down, effectively doubling the amount of reinforcement of correct movement patterns and skills during each set. This should help speed up the process of learning the complex movements.
- More of a good habit forming aspect to complicated lifts, is to tell athlete’s to put the bar down, the same way they picked it up. Replicating the movements and positions as the bar is set back down. This prevents absent minded RDL’s creeping into setting down cleans etc.
- Using the hang, the pull or the shrug
- like whole part whole, part of the movements can be introduced as separate exercises, pulls and shrugs, the hang (starting high) or power (finishing high) can be integrated based on what they provide most of.
Hang: proprioception, close position at the thigh, transition into the catch
Power: accelerated pull, less neurally taxing, greater starting strength
Pulls: a supermaximal load, pulled from the floor, through first and second pulls to V-max, but not caught. This improves explosive power and recruitment of MHCIIx fibres due to increased loading potential.
Shrugs: like the pull, but taken from the hang, combining lower supermaximal loads, with the benefit of the close thigh and acceleartion stimulus of the pull.
- like whole part whole, part of the movements can be introduced as separate exercises, pulls and shrugs, the hang (starting high) or power (finishing high) can be integrated based on what they provide most of.
In all cases
- Break down the movement into manageable chunks of deliberate and corrective practice.
- Enforce correct patterns to replace incorrect ones
- Move beyond the breaking point, don’t start with failed movements, if the transition means the bar is getting away from the body, start from above the knee with a correct position, and work outwards from there to replace poor habits with good ones.
- Focus on the fix; train with purpose, and work on the area that’s causing the technique to break down.
- Reinforce and reintroduce: once good habits are established, gradually introduce this to the full lift as part of a set (complexes), this will allow you to reinforce the correct patterns, as well as create a link between the newly established pattern, as well as how to correct the fault that caused it to be performed incorrectly in the first place.
- Build the jigsaw outwards: once one phase, or piece of the puzzle is corrected, link it with the adjacent pieces, and build the big picture out from there.
And importantly – use all of the above in your warm up exercises up to around 70% of 1RM
Overcoming Structural Issues
The difference between a technical issue and a coaching issue is one of significance.
If there is a structural issue, such as tightness in the soleus and gastrocnemius (calves), then shouting at them isn’t going to make them lengthen.
A structural issue is one that requires a strategy of corrective exercises (eg: stretches and stability training) and will require weeks of dedicated programming to rectify.
A technical issue, is one the athlete has the capability of performing, but is performing it incorrectly, due to inaccurate or incorrect movements, despite ability to the contrary. This is fixed by coaching cues, teaching and progressively getting the athlete to develop their skills in training.
If we have a structural issue, we need to work around it on the day.
Note: this does not mean ignoring it!!!!
Corrective strategies should be implemented immediately to rectify the issue, however we can still make concessions while removing the structural limitation.
For instance,
- Lifting from blocks where athletes are too inflexible to take the weight from the floor.
- putting pulling straps over the barbell to hold during front squats (while stretching rotator cuff and lats)
In all cases, if significant mobilisation is required to perform basic movements, you’ve greater underlying problems and a corrective course of stretching and stability will be required.
While the corrective strategies are ongoing, you can make reasonable adjustments to facilitate continued training.
However, never sacrifice technique for weight, and ensure you fix the underlying issues to ensure continuing progress that is safe, productive and minimises risk of injury.
EqiupmentSome general advice on usage of equipment:
- Pulling Straps: useful for pulls and shrugs, it’s how big the weights are, not the callouses. Save the hands for the snatches and cleans, and use the super-maximal stimulus for appropriate training and development of explosive power and strength.
- Lifting Shoes: are an essential piece of kit long term, it provides a stable and solid surface for the delivery of force, and development of power and strength. Trainers are designed to dissipate force, reducing impact stress on knees while running on hard surfaces, lifting shoes are designed to transmit force, with minimal to no dissipation. This is why “hybrid” shoes are great marketing for a crap product. Either you want force transmission or don’t, you don’t get the best of both worlds, just the benefit of neither, and potentially the worst of both when using them for the unintended purpose. (lost force in lifting, greater knee impact in running).
- Belts: the worlds greatest placebo, ok maybe that is a little harsh, but at least i’ve got back your attention. Belts have a place in training, rehabbing from injury? a temporary stabiliser? great. Using them for curls? seriously why?…. We need to incorporate training to maintain lumbar and thoracic strength and stability, don’t rely on belts when you don’t have to, and if you can avoid them, do it. Sometimes they’ll be necessary, but shouldn’t be used as a crutch or with submaximal weights as a replacement for core and back training.
- Gloves: no, just no. leave your velvety hands alone, chalk for good grip and wash and moisturise after training to keep callouses elastic and prevent them from tearing.
All that’s left now is to go out, and put it all into good, deliberate, and performance enhancing practice.

Comments are closed, but trackbacks and pingbacks are open.