
Section 2: Variations and Phases:
There are variations in each lift, as well as different phases that the lifter will complete as part of the lift.
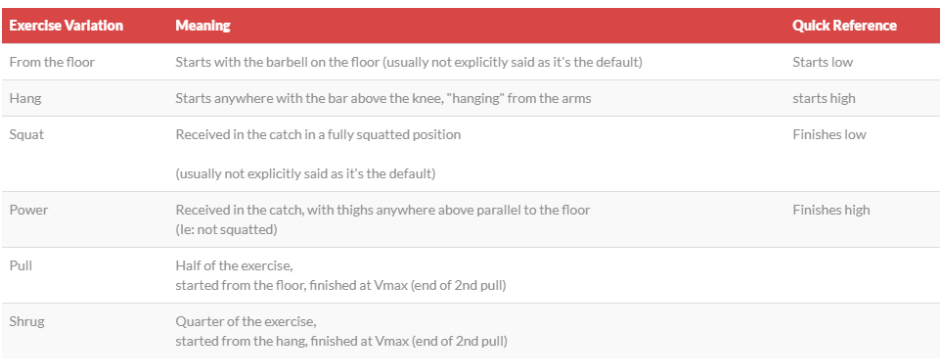
To keep them simple we’ll start with identifying the key terms of the variations. These are alternative ways of doing the lift, using only part of it as an exercise in itself:
Variations on the classic lifts:
Phases:
There’s lots of ways of making the Olympic lifts complicated, but in reality, there’s lots of very similar concepts throughout all three lifts, and it’s all about getting maximum height and power into the lifts.
The lifts are broken down into phases, each with different biomechanical coaching points to help keep the bar moving, and in a way that gives the best power generation, and transfer of skill and fitness.
There’s different schools of thought on how many phases there are exactly, but let’s look back to our definition for the snatch as an example;
one (1) uninterrupted, accelerated movement from the floor to overhead, catching with arms locked
the key word is the first one. One, there’s one movement, one pull, and one continuous acceleration of the barbell until it’s caught. It’s pretty much a pizza, you can slice it into as many pieces as you like, it’s still just one pizza. The different phases are no different, at the end of the day, it’s still just one lift.
So why do some schools of thought break it into 3 parts, some into 5, some even into 11… it’s simple, they’re focusing on one aspect of the whole lift. There’s certain things that remain constant, such as the hips and shoulder positions in the first pull, and some things that change (hip and shoulder during second). But lets not get too far ahead of ourselves.
The phases of the snatch, clean, and the jerk are explored a little further down, and if you ever get lost, we’ve made some handy posters you can print out and keep.
Phases of the Snatch and Clean:
In both the snatch and clean, the names of the phases are the same.
The exercises are fluid and dynamic, there’s no pause, no stop, until the bar is caught. The idea is to move smoothly and fluidly between all of the positions in sequence to achieve a powerful and accelerated movement, to enhance sports performance. We’ll break down each part of the sequence in each lift, but for now, let’s identify the names associated with the positions and movements. The positions are named relevant to where the barbell is in relation to the body or lift.
To perform the lifts well, we move ourselves around the bar, rather than the bar around ourselves.

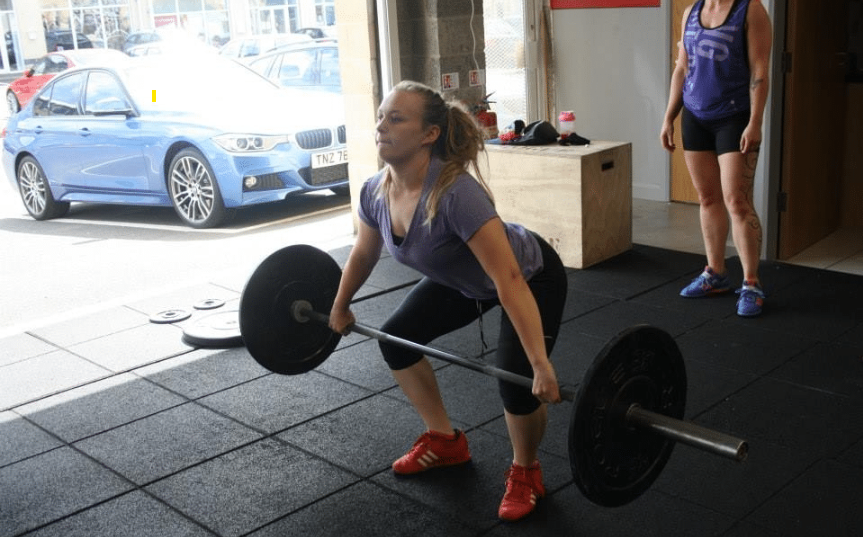
- The Start Position: The left most image shows the start position, just like the name implies. this is the first position that the lifter will perform during the exercise. Throughout the entire lift, as with all strength and power exercises, there must be a neutral spine (chest out, back flat).
- First Pull (and transition):
- The first pull, (2nd image) is the movement that includes everywhere from the start position, to where the bar is just below the knees. It commonly includes the transition phase, and either finish positions of the first pull are acceptable, as long as you’re clear when discussing terminology with athletes and other coaches.
- Transition: the stage of the lift that includes the barbell passing from immediately below the knee, to immediately above the knee.
- Second Pull (and triple extension / Vmax):
- The second pull begins immediately as the barbell passes the knee (just above the knee position) and finishes at a full extension of the hip, knee and ankle (3 joints = “triple extension”) there’s also a contraction of the trapezius, or shrug of the shoulder, but for some reason, it never gets mentioned, seems a lot of S&C coaches struggle to focus on more than one area at a time.
- The triple extension, as mentioned is where the lifter has fully extended hips, knees and ankles, and shrugs the shoulders (not arm pull) to give the bar maximum height and speed. This is why it’s also known as Vmax, which you will see in some of the literature if you read more about using these lifts from different journals.
- Pull Under:
- Where Vmax is the fastest velocity of the barbell, the pull under is the fastest part of the entire lift by the body. Once you’ve achieved maximal extension, and not a millisecond earlier, you aggressively and powerfully pull yourself under the barbell. Here’s an excellent resource on one of the most overlooked topics of the weightlifting movements. The importance of pulling under the bar.
- Catch:
- The catch, is exactly what it sounds like, it’s the point where the lifter catches the bar. This will be either, overhead if the lift is a snatch, or on the shoulders, where the lift is a clean.
- Recovery:
- Once you’ve caught the barbell, you need to stand back up with it, this is called the recovery phase. Especially with competition lifts, but also as good habit for all athletes, stand fully up before dropping the barbell.
Phases of the Jerk:
The Jerk doesn’t start from the floor, so the phases are slightly different.
There’s three main variations,
- The Split Jerk, which is the standard competition lift that the overwhelming majority of competitive lifters use.
- The Power Jerk: which certain populations are hell bent on calling the “push jerk”, it’s not, it’s a power jerk and always has been.
- The Squat Jerk: best left to the handful of Chinese and Korean lifters who do it (Lu Xiaojun, WR holder and multiple Olympic gold medallists is a great example)
For all of the above variations, the start, dip and drive are the same, as is the quick transition into the catch, but the catch has some variation on foot placement, hence the name changes, and once caught, the final recovery position is the same for all 3, this is a competition rule in the sport.

- Start:
- Finish position of the clean, stood upright with bar on the shoulders
- Dip
- knee, hip and ankle flexion, coming into a shallow squat, the depth is lifter specific and what’s comfortable
- Drive
- Back up to triple extension and Vmax, much like the second pull of the snatch and clean
- Catch
- catching with the bar overhead, arms straight and knees bent. (one good reason we don’t say push jerk, is that the arms are not there to push the bar up, and “pushing” means a lack of leg drive, usually causing faults we’ll explore shortly.
- Recovery
- Returning feet into line (across the frontal plane) with bar positioned stationary overhead.
Looking like an absolute pro:
We’ve all felt out of our depth at times, and there’s nothing like the olympic lifts to give enormous satisfaction, as well as equal doses of anxiety for some new and experienced athletes.
Some shy away, and avoid them because they’re complicated, but here’s some quick tips to make you stand out and look like you’ve been doing it for years, even if it’s your first day giving them a go:
1. Don’t step over the bar: Yea, it seems a bit of an odd one, but weightlifters are pretty precious about their equipment, and when a decent IWF barbell will set you back almost a grand, (and more if you bought it a while back), they expect that the equipment will be looked after and respected.
Stepping over a barbell is a big no no, and enough to get you kicked out of some national training centres around the world. A barbell is the first thing that’ll bury you if you underestimate it, so show respect, walk around, and then rip up the floor boards. On a practical level there’s less chance you’ll accidently hit it with your foot, which in competition is a no lift, and a horrid way to miss out on an otherwise great attempt.
2. Empty bars for setting, full ones for dropping: much like the one above, empty bars, set them down, the weights are designed to be dropped, but prolong the life of your nice expensive equipment and only drop it when it’s loaded. Also, yea, drop it. The lifts are powerful and strong, if you’ve done it right, you’ve used your legs to lift a weight way above your best shoulder press. The signs you see around gyms and grumpy stares from passive aggressive shufflers and meat heads that say “if you’re strong enough to pick it up, you’re strong enough to set it down” they’re bullshit. If you see them in your gym, it’s time to move gyms. It means a few very clear things, (i) nobody here has ever lifted a heavy weight here in their life, so the atmosphere is going to suck when you start loading all the 25’s in the entire building onto your bar (ii) if you lift properly and drop it, which is the safe way to do it, you’re going to get kicked out, or someone’s going to walk across your falling barbell and get hurt, so may as well jump before you’re pushed (iii) the equipment won’t be up to a decent standard, and (iv) the facility isn’t equipped, so the kit will break, or the floor will, or the temper of the guy behind the desk fobbing through cosmo or mens health looking for the next fad to exploit. Basically, find a place that looks at you strange if you don’t drop weights and call it home.
3. Hook Grip: Thumbs under fingers, it’ll hurt like a mofo, but do it while the weights are light, it’s a lot better than trying to bring it in when the weights get heavy. This grip alone made a difference of 40% on my own competitive lifts, and you’ll use it so much, you’ll be walking down the street holding your thumbs, and using it to change gears driving your car.
4. Keep it clear: this goes for you and your plaftorm. Your platform must always be clear of any weights, collars etc. Don’t leave them lying around, it’s unprofessional and makes you look like an amateur. The platform is a designated lifting and dropping space, it doesn’t need anything that’ll cause the barbell to aggressively mangle your shins when it ricochets off the random assortment of debris around your feet.
The same advice goes for line of sight. The weightlifting movements are super complicated, and will require a lot of conscious thought at the beginning. Getting a spot in front of you as a lifter to focus on, and not feeling crowded like a patient during rounds is crucial. Don’t walk in front of a heavy (near maximal attempt) and don’t linger in front of lifters if you can avoid it. On the other hand, some lifters need to learn to focus on their lift, and less on their environment, so it’s not a set in stone rule, just a rule of thumb, use your judgement.


Comments are closed, but trackbacks and pingbacks are open.