
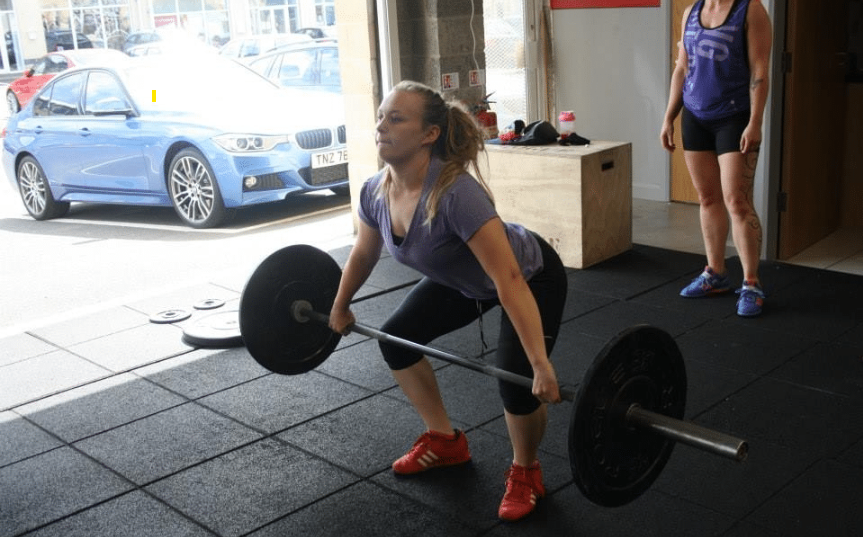
Exercise 1: the Snatch exercise:
Definition: one (1) uninterrupted, accelerated movement from the floor to overhead, catching with arms locked.
Variations:
The Hang Snatch: A snatch, but with the bar starting “hanging” in the arms, already elevated above the floor
The Power Snatch: A snatch, but catching the barbell in a position with the thighs at or above parallel with the floor.
These terms can be combined into a hang power snatch, where the lifter starts with the bar already elevated off the floor, and catches the barbell in a high position (thighs above parallel).
The snatch can also be broken down into different phases. The different phases below offer some simple ways to explain the key markers where there are subtle changes in technique to most effectively lift the barbell.
There’s a chart at the bottom of this page that you can use as a guideline and print it for your own reference or for the wall in your gym.
Just before we get into the phases, it’s important to know how to grip the barbell:
Grip:
 The grip of the snatch is found with an empty bar or brush handle.
- It is the width where the lifter can stand straight, holding the bar with straight arms, and the bar rests along the waistband
- A lot of new lifters find the grip very wide and difficult to understand, but the purpose is to ensure the fastest and closest bar at Vmax, therefore it’s essential that the bar is at the hip with straight arms.
- You can test this by lifting each knee up to waist height, if the bar is gently resting on the thigh, you’re spot on.
- Another way to get the grip is to set the bar in the crease of the hip, without holding it in the arms, (need a lot of hip flexion like a good morning or RDL), and slide hands laterally along the bar, until the arms straighten. They take your (hook) grip, and stand up.
- Once the grip is established, use the barbell markings to ensure a consistent start position. Beware of odd bars and powerlifting markings, as they are different widths.

Phases of the Snatch:
The key phases are: the first pull, transition, second pull and catch. These will be second nature to you soon.
One thing to bear in mind, the snatch is a very complicated exercise, and takes considerable, deliberate time and practice to master. one of my very first weightlifting tutors had a great question, which i’ll comes up time and again.
“What does practice make?…” and inevitably when someone said perfect, he’d interrupt and say “no, permanent” (Lyndon John, 2002)
It’s an interesting, and very true observation, if you practice your faults, you’re going to repeat them, only deliberate practice, that reinforces good movements, skills and techniques will ever lead to perfection, and even then, it’s a long shot, so take your time, feel the positions, and enjoy the movements, you’ll be using them for a long time to come, may as well get comfy.
Start Position:
 The start position is where the bar is about to separate from the floor, it is the first position on the lift.
- Set up by bringing the edge of the laces under the barbell, level with the knuckles of the toes.
- There should be a small gap between the shins and the barbell, this will allow the bar to move slightly towards you during first pull. The bar should move either straight up, or slightly back, but not forward at this point.
- Feet should be hip width apart (not between feet and shoulder, as your shoulders have bugger all to do with your feet, and some ladies hips are wider than shoulders, so no need to do more harm than good)
- Arms straight and loose
- Head looking straight, forward, and level. (the fluid canals in your ears affect balance, so keep the head level throughout. rather than looking at the floor)
- Hook Grip!
- The weight distribution should be on the forefoot, on the balls of the feet (but not the toes)

First Pull:
 The first pull starts as the bar separates from the floor, and ends just below the knee
- The bar should move slightly towards you during this movement, or straight up.
- The back is flat and the chest is spread, and take a deep breath before you lift. (valsalva / epiglottal bracing), causing high pressure and a solid base by squeezing the diaphragm.
- The centre point of the chest (where the ribs meet at the base of the sternum) should be directly over the barbell, this is what we mean by chest over the bar.
- A good cue to begin to move the bar is lead with the chest, or push the floor away, as the chest position elevating will lift the bar.
- The hips and shoulders should move at the same rate, keeping the back angle constant to the floor during the entire first pull. (parallel white lines shown)
- The cue “knees back” is often used, but this can be good or bad cue, depending on the movement.
- Knees of lifters with shorter femurs won’t move back noticeably at all, and longer femurs will be more noticeable due to the mechanics involved.
- If the bum lifts and back angle changes, forget knees back as it’ll make it worse
- If the you are moving on to the toes, “knees back” although i’ve had better success with “let the hips drift back slightly”, to get the bar to move subtly towards the lifter without causing a massive swing of the bar at Vmax.
- The weight distribution move gradually back towards the ankles throughout the first pull. You may hear weight on the heels as a cue, like knees back, it’s good or bad depending on the understanding. The heel (calcaneus) is directly below and behind the ankle, and some lifters think its somewhere behind the back of their shoe. A good way to know you’re in the sweet spot is if you can wiggle your toes, but not tap your feet while holding the barbell stationary.

Transition:
 The transition occurs as the bar passes the knees.
- The knee angle should remain fixed as much as possible during this time (barbell moving from below the knee to above the knee)
- Any large knee extension will put the load onto the back, which isn’t ideal, as it will then take over the lift, losing the effectiveness for triple extension
- Any large knee flexion will stall the barbell, slowing it down, and making it harder to accelerate the barbell.
- Some schools of thought taught the scoop or regrouping phase of the lift, in short, they’re disappearing as more research comes out. If you base movements on collegiate basketball player studies, of course they’re going to have noticeable knee flexion and extension, their legs are longer than most entire humans, and they’re not going to be the best technical lifters on which to base your movement skills.
- Elite level lifters in studies, and investigation of movement mechanics show that a minimisation of movement (knee flexion and extension) at this point of the lift is optimal, even if it does occur.
- This is also the point where the weight distribution should become semi-fixed, pushing through the ankles until the very last second.
- In short, try to bend your knee as little as possible as the bar passes by, or for some, push knees to the side, keeping the bar close as it passes, though this is a little more advanced than day 1.

Second Pull:
 The second pull starts is where the bar finishes transitioning past the knee, and continues through triple extension (Vmax).
- The bar should be in contact with, but only skimming the thighs, too far away, and it’s a back lift, resting on the thighs with knees too far under, and it’s a stall. brush or skim the thighs on the way past. Treat the bar like your favourite and sharpest razor, and aim for a close and smooth shave, rather than a hairy or bloody mess.
- If the bar wants to fall forward and away from the thighs, the knees are extended and too open, causing the back to do much of the lift, this isn’t a deadlift in the conventional powerlifting sense, we need to keep accelerating the bar upwards. The weight is also likely too far onto the balls of the feet.
- “Load the hamstrings” – boy do i hate this one at times, somewhere the consensus on the difference between a loaded muscle and a stretched one went out the window. If you ask any athlete to show you a loaded bicep, they’ll do the standard emoji bicep flex, and they’re right. So if we look at the knees, they are the equivalent to the elbow joint in the legs, so a loaded hamstring is a bent knee. More often than not, you ask someone to load their hamstrings, they’ll do a good morning or RDL where they feel their hamstring stretch…. the exact opposite of what we want to occur at this point. The knees should remain flexed, stretching the quads and glutes (muscles around a joint in flexion) which then pull harder as they’re preloaded and stretched (SSM from way back in theory). When glutes and knees extend, (along with ankles), we get a vertical jumping movement, the most effective way of getting a barbell into the air.
- Anyway… the continually extending knee, and hip continue to accelerate the bar vertically, reaching maximum acceleration as the bar reaches the height of the hip.
- At the very last instant, the pull is accelerated further by plantarflexion of the foot (push balls of the foot into the floor, heels lift), and shrugging of the shoulders, completing the second pull and reaching Vmax.
- The arms are still straight, and we’re looking for maximum vertical displacement, and minimal horizontal displacement of the bar.

Catch:
 Final movements of the snatch occur to secure the bar overhead, and the movement is instantaneous with the end of the second pull. A key reason it’s so important to shrug, is that this gives the timing to pull under the bar. unless we suddenly grow 10cm during a lift, once we’ve reached maximum extension, owing to our acceleration and upwards momentum, the feet are going to leave the ground.
- As soon as the feet separate from the floor, the lifter aggressively pulls under the bar to secure it overhead, skimming the body close, fast and low in relation to the bar. Heavier bars won’t go as high, so a full squat position is needed for the heaviest of lifts.
- The feet move out from the pulling (hip width) position, to just outside of hip width, to accommodate the hips in the squat. The distance should be about half the width of the foot on each side.
- Feet will land turned out, about 10 and 2 of a clock face, or 16 degrees.
- It’s not a flop or a drop, but an active pull under the bar to catch it securely overhead. (dropping happens to you, pulling under is something you actively do.)
- Once the bar is secured, the lifter stands back up, drops the bar, and goes again.

Overview:
You can click the image below to get a large printable copy to keep with you, or ask us during your practical and we’ll get large posters made up for the class to take away.


Comments are closed, but trackbacks and pingbacks are open.